Tuesday, June 29, 2010
No Bake Day Today
Sadly, because of my hectic work schedule this week, I was unable to bake anything today. Hopefully in the next few days I will be able to find some time. I know I am going to be making Apple pies for the Fourth this weekend.
Tuesday, June 22, 2010
Strawberry Pastries

For these, I followed the same basic recipe for the Mini Apple Pies but I added Confectioner's Sugar and a Dark Chocolate Drizzle.
Mini Fruit Pies

To celebrate the first day of summer I decided to make a traditional summer dessert: Pie
You can use any fruit pie mix for this recipe (which is for apple) but I substituted it for peaches. Later I will also make strawberry and apple.
1 Package Frozen Puff Pastry Sheets (One package has 2 sheets)
1 Can (21oz) Apple Pie Filling
1 Egg
1 Teaspoon Water
All Purpose Flour
Brown Sugar to Taste (Optional)
Cinnamon to Taste (Optional)
Vanilla Ice Cream (Optional)
Allow Pastry sheets to thaw to room temperature by laying out flat on a lightly floured, flat surface (aproximately 40 minutes). Cut out (Four and a Half Inch) 4 1/2inch rounds and remove excess. Set excess aside. Fill each round of dough with 1 Tablespoon of pie filling*. Fold remaining dough over to make a half circle and pinch ends together with a fork.
*You may want to drain some of the extra syrup or gel from your pie filling before hand as this part can become a bit messy. If the dough becomes too saturated with the filling it will be hard to pinch the edges closed. If you'd like, you may add brown sugar or cinnamon to the pie filling ahead of time.
Set the filled half circles on your baking sheet.
With a little flour and a rolling pin, roll out remaining pastry dough and repeat the process until there is not enough dough left for another circle. Throw this little bit away.
In a small bowl wisk together the egg and water. Brush lightly on each half circle to make the pastry a dark golden brown. (I did not do this to my mini pies)
Bake for 15min. Allow to cool for 5 minutes before eating. Serve with Ice Cream and enjoy!
Thursday, June 17, 2010
1st Birthday Cake

This is a cake I made today for my neice Ava who is turning 1 this weekend.
Because this is a family obsessed with Disney, and because Ava's grandmother (and blog follower) Heather asked me to do a Disney cake, I chose to do a baby pink Minnie Mouse cake.
Originally I wanted to put little Minnie Mouse shaped heads on the sides where the polka dots are, but luckily Ava's grandmother said it would look too busy with the addition. We will be writing a "Happy Birthday" note on the cake later, but in all honesty, I really like the simplicity of the cake. Less is more... even for children's bithday cakes.
Things I learned while baking this cake:
It is really hot outside! Now I understand the phrase, "If you don't like the heat, then get out of the kitchen." Also, because it was so hot today (a mere 97 Degrees), Cream Cheese icing was not a good idea. Yes it tastes great, and yes there is a nice contrast with the chocoate incing on top, but it does not hold its shape well in high temperatures. If you'll notice, even after two layers of the icing, the icing seems to be slowing melting off.
Oh well, Bake, Mistake, and Learn!
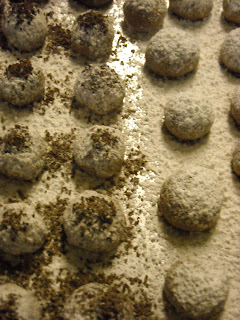
Chocolate Pistachio Wedding Cookies
1 Cup Butter, softened
1/3 Cup Confectioners' Sugar
1 Cup Ground Pistachios*
1 Teaspoon Vanilla Extract
1/2 Cup Grated Semi-Sweet Chocolate
2 Cups All-Purpose Flour
Confectioners' Sugar and Grated Chocolate for dusting
* I split the recipe in two after mixing the butter and confectioners' sugar. I did one half batch of pistachios and the other pecan. You would need only a 1/2 cup of each if you do this.
Preheat oven to 350. Line a baking sheet with parchment paper.
Beat butter and confectioners' sugar until creamy. Add nuts and vanilla, beating until combined. Add chocolate and beat just until combined. Stir in flour until smooth and evenly mixed.
Roll dough into 1-inch round balls and place on baking sheets. Cook for 10-12 minutes or until lightly brown. Allow to cool on sheets for at least 2 minutes. Dust with confectioners' sugar and chocolate. Remove from sheets and place on wire racks.
Makes aproximately 4 dozen cookies.
I really enjoyed the pecan version of this cookie, but I wasn't such a big fan of the pistachios. Really any nut could be used. I would also recomend Honey Roasted nuts to give the cookie a sweeter taste.
1/3 Cup Confectioners' Sugar
1 Cup Ground Pistachios*
1 Teaspoon Vanilla Extract
1/2 Cup Grated Semi-Sweet Chocolate
2 Cups All-Purpose Flour
Confectioners' Sugar and Grated Chocolate for dusting
* I split the recipe in two after mixing the butter and confectioners' sugar. I did one half batch of pistachios and the other pecan. You would need only a 1/2 cup of each if you do this.

Preheat oven to 350. Line a baking sheet with parchment paper.
Beat butter and confectioners' sugar until creamy. Add nuts and vanilla, beating until combined. Add chocolate and beat just until combined. Stir in flour until smooth and evenly mixed.
Roll dough into 1-inch round balls and place on baking sheets. Cook for 10-12 minutes or until lightly brown. Allow to cool on sheets for at least 2 minutes. Dust with confectioners' sugar and chocolate. Remove from sheets and place on wire racks.
Makes aproximately 4 dozen cookies.
I really enjoyed the pecan version of this cookie, but I wasn't such a big fan of the pistachios. Really any nut could be used. I would also recomend Honey Roasted nuts to give the cookie a sweeter taste.
Tuesday, June 15, 2010
Wedding Cookies

Today I made some Chocolate Pistachio and Chocolate Pecan wedding cookies. The cookies were well recieved, but because I am my own worst critic, I wasn't terribly impressed with them. I liked the amount of chocolate and the amount of nuts in the recipe (which I will post tomorrow evening), however, even for wedding cookies, I thought they were a little dry. I would maybe add a little more butter (maybe 1/4 of a cup) or add less than the required 2 cups of flour.
Monday, June 14, 2010
Tuesday Bake Day
It is June, the month of weddings, and seeing as how I recently lost (and found) my engagement ring, weddings are on the brain. I will be making wedding cookies, but instead of making traditional Russian wedding cookies, I will be following a recipe by Paula (add more butta y'all) Dean in which the cookies are made with chocolate and pistachio nuts instead of vanilla and pecans. I may still make a half batch of cookies with pistacios and half with pecans- I am, as of yet, undecided. I've never made wedding cookies before so wish me luck!
Sunday, June 13, 2010
Cake Evolution

It is so interesting to see how far I've come in the last year. The white cake (3rd photo down) was my first cake. Then Noah's cake, then the Starbucks cake, then the Green flower cake, then the Raspberry lemon, then Jessica's birthday cake, and now the French Vanilla Cake.
It is a nice motivation to see my progess, but it is also a reminder of the techniques I have not mastered yet.
Noah's Cake

When my bestfriend (who LOVES frogs) had her first child I made her this cake.
She, her husband, and their families ate this cake to celebrate Noah's first day home.
This was one of my first disaster cakes- it isn't very noticable in the picture but the cake leaned. I didn't cut the layers evenly and I added too much icing to compensate the problem. Also, when making bright or vibrant colors with Gel food coloring, one must remember that a little goes a long way. The only complaint I got from my friend is that after eating the cake, everyone's mouth was bright aqua. Something I also learned with this cake, Gel food coloring will darken over time. This is the color of the cake right after I finished decorating it... the next morning it was more of a dark teal color.
That is what this whole process is about Dollies, bake, mistake, and learn!
Starbucks Cake

Right before I left my job at Starbucks I made this cake.
It was a devil's food cake with Almond flavored icing and star shaped marshmallows.
I tried to do the logo of the Siren. I think for my first attempt at figure design it wasn't as bad as it could have been, however, it could certainly use some work.
What design should I try next?
First Try at Decorating

This was my first cake.
My attempt at using professional tools to decorate the cake.
Friday, June 11, 2010
French Vanilla

French Vanilla Cake with Buttercream Icing
Chocolate Hazelnut filled wafers and Dark Chocolate Shavings
Red Velvet Birthday Cake

I made this cake for a friend's birthday.
The polka dots and balls are fondant while the butterflies and daisies are a topper I made.
Photos of Past Cakes
I have only taken the first course Decorating so, by no means am I a professional. I am an amateur who simply wants to learn by experience.
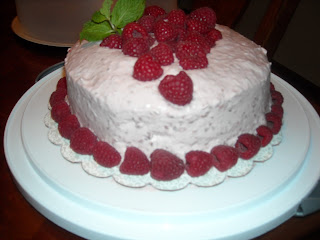

Raspberry Whipped Cream Icing, Raspberry Puree Filling, Lemon Cake
Hello! Dollies
Hello everyone!
Inspired by the Julie Powell project, I am going to use this blog to further my baking abilities. I will bake or make a new dessert every week and let you know how it goes. If it tastes good, or blows up in my face, I will post it along with pictures of my creations.
I have loved baking ever since I was a kid- when my mom and I would make Hello Dollies for Christmas. Maybe that is why when I moved out of my parents' house I discovered a passion for baking. I constantly want to try to make new things and make old favorites better by adding something new. I hope you enjoy reading my posts as much as I will enjoy making them.
Subscribe to:
Posts (Atom)